在 firewalld 中,为连接 lo (loopback) 选择区域代表着控制本地服务与本地主机(localhost 或 127.0.0.1)之间通信的策略。虽然通常情况下,lo 接口会被分配到 trusted 区域,但这并不意味着完全没有控制。
firewalld里面为连接lo选择区域代表什么?
NixOS由于网络问题安装卡46%解决方法
以下步骤是在liveiso中做的。
依据 https://mirrors.tuna.tsinghua.edu.cn/help/nix-channels/ 教程,修改 /etc/nix/nix.conf 中 substituters 为:
substituters = https://mirrors.tuna.tsinghua.edu.cn/nix-channels/store
即可:

如果保存时报错文件不可写,就sudo rm nix.conf把nix.conf这个指向不可写的文件的符号链接给删掉,重新保存即可。
使得电脑开机后登录时自动登录校园网
我这边的校园网使用强制门户来实现登录。
当要求你通过浏览器登录时,按F12打开控制台,选中网络,找到那个发送你学号、密码的请求,右键,复制为curl,我这边的复制结果如下所示(******为打码内容):
curl --silent 'http://10.7.0.103:30004/byod/byodrs/login/defaultLogin' --compressed -X POST -H 'User-Agent: Mozilla/5.0 (X11; Linux x86_64; rv:122.0) Gecko/20100101 Firefox/122.0' -H 'Accept: application/json, text/javascript, */*; q=0.01' -H 'Accept-Language: zh-CN,en-US;q=0.7,en;q=0.3' -H 'Accept-Encoding: gzip, deflate' -H 'Content-Type: application/json' -H 'X-Requested-With: XMLHttpRequest' -H 'Origin: http://10.7.0.103:30004' -H 'Connection: keep-alive' -H 'Referer: http://10.7.0.103:30004/byod/view/byod/template/templatePc.html?customId=26&nasRedirectUrl=http://10.7.0.103:30004/byod/index.html?usermac=******&userip=10.121.3.156&userurl=http://detectportal.firefox.com/canonical.html&original=http://detectportal.firefox.com/canonical.html&ssid=E' -H 'Cookie: testcookie=yes; userip=10.121.3.156' -H 'DNT: 1' -H 'Sec-GPC: 1' --data-raw '{"userName":"******","userPassword":"******","serviceSuffixId":"-1","dynamicPwdAuth":false,"code":"","codeTime":"","validateCode":"","licenseCode":"","userGroupId":0,"validationType":0,"guestManagerId":0,"shopIdE":null,"wlannasid":null}')打开控制台,粘贴你复制的东西,回车,应该会返回“成功登录校园网!”之类的结果。
确认通过curl发送这个请求可以做到登录校园网后,接下来你需要做的就是让你电脑在登录时自动运行一下这段命令。
下面以 GNU/Linux 为例,使用systemd做到用户登录时自动执行某个服务:
先把上面代码转换成脚本的形式,此时可以请ChatGPT加一个登录失败自动重试逻辑:
校园网登录.sh
#!/bin/bash

while true
do
    response=$(curl --silent 'http://10.7.0.103:30004/byod/byodrs/login/defaultLogin' --compressed -X POST -H 'User-Agent: Mozilla/5.0 (X11; Linux x86_64; rv:122.0) Gecko/20100101 Firefox/122.0' -H 'Accept: application/json, text/javascript, */*; q=0.01' -H 'Accept-Language: zh-CN,en-US;q=0.7,en;q=0.3' -H 'Accept-Encoding: gzip, deflate' -H 'Content-Type: application/json' -H 'X-Requested-With: XMLHttpRequest' -H 'Origin: http://10.7.0.103:30004' -H 'Connection: keep-alive' -H 'Referer: http://10.7.0.103:30004/byod/view/byod/template/templatePc.html?customId=26&nasRedirectUrl=http://10.7.0.103:30004/byod/index.html?usermac=******&userip=10.121.3.156&userurl=http://detectportal.firefox.com/canonical.html&original=http://detectportal.firefox.com/canonical.html&ssid=E' -H 'Cookie: testcookie=yes; userip=10.121.3.156' -H 'DNT: 1' -H 'Sec-GPC: 1' --data-raw '{"userName":"******","userPassword":"******","serviceSuffixId":"-1","dynamicPwdAuth":false,"code":"","codeTime":"","validateCode":"","licenseCode":"","userGroupId":0,"validationType":0,"guestManagerId":0,"shopIdE":null,"wlannasid":null}')

    code=$(echo $response | jq -r .code)

    if [ $code -eq 0 ]
    then
        echo "成功登录校园网!"
        exit 0
    else
        echo $response
        echo "登录失败,Retrying in 1 minute..."
        sleep 60
    fi
done
然后参考archwiki/Systemd/用户,在~/.config/systemd/user加一个校园网登录.service文件:
校园网登录.service
[Unit]
Description=校园网自动登录
After=network.target
[Service]
ExecStart=sh ./校园网登录.sh
WorkingDirectory=%h/Program/运维自动化

[Install]
WantedBy=default.target
然后 systemctl --user daemon-reload 让 systemd 用户实例检测到 校园网登录 这个服务。
先 systemctl --user start 校园网登录.service 单次启动 校园网登录 服务,然后,查看状态:
systemctl --user status 校园网登录.service
○ 校园网登录.service - 校园网自动登录
     Loaded: loaded (/home/voyage200/.config/systemd/user/zhbit_net.service; disabled; preset: enabled)
     Active: inactive (dead) since Sun 2024-11-24 17:44:53 CST; 2min 49s ago
   Duration: 258ms
 Invocation: 49c7ae4fd0074bccbf3b04d7953941bb
    Process: 31271 ExecStart=sh ./校园网登录.sh (code=exited, status=0/SUCCESS)
   Main PID: 31271 (code=exited, status=0/SUCCESS)
   Mem peak: 2.3M
        CPU: 14ms

11月 24 17:44:53 VC200 systemd[639]: Started 校园网自动登录.
11月 24 17:44:53 VC200 sh[31271]: 成功登录校园网!
通过日志可以观察到脚本正常发送了请求,并接收到了来自校园网认证服务器的成功登录的回应。
确认服务正常运行后,我们 systemctl --user enable 校园网登录.service 就大功告成了。
Tips :systemctl --user enable --now 校园网登录.service相当于先 enable校园网登录.service后 start校园网登录.service。
对于 windows 用户只需要让GPT把上面脚本由.sh转换成.ps1即可,然后使用“任务计划程序”也能做到登录后自动执行脚本的效果。
Gemini 目前不支持你所在的地区。敬请期待!:解决方法
截至 2024年10月,Gemini APP 不为香港提供服务。
梯子节点换成美国、日本之类的地区就好了。
GNOME 笔记本AMD Nvidia 双显卡 从 Xorg 切换到 Wayland
前置确认:Xorg 下运行良好
切换方法:用户登录页面右下角选GNOME,不选GNOME Xorg
问题1:卡顿
使用 mission center 确认 GNOME 此时在用AMD核显当主GPU,不是预期的 Nvidia 卡当主GPU。
怀疑问题为AMD核显太弱带不起 显示器+笔记本自带显示器 所致。
尝试: 切换 主GPU 到 Nvidia 卡。
使用搜索引擎:
通过最后一个回答,转到 GNOME mutter 的一个 PR,在PR描述中得到切换方法:
To make it possible for the user to override the automatically calculated default, make it
possible to override it using a udev rule.
E.g. to select /dev/dri/card1 as the primary GPU, add a file e.g.
/usr/lib/udev/rules.d/61-mutter-primary-gpu.rules (path my vary
depending on distribution) containing the fellowing line:
ENV{DEVNAME}=="/dev/dri/card1", TAG+="mutter-device-preferred-primary"
Reboot or manual triggering of udev rules to make it take effect may be
required.
按照上面的方法切了默认主GPU重启果然变流畅了!
小插曲:我没法确认 /dev/dri/ 下的 card0、card1 ,哪个才是我要的N卡,问了GPT,知道了可以先用 lspci | grep -i nvidia 获取 N卡 在PCI总线上的地址标识符,再通过 ls -l /sys/class/drm 判断出来哪个才是我要的N卡了。
2025.3.25更新:直接使用https://github.com/ewagner12/all-ways-egpu脚本也能方便地达到切换的效果!
推荐设置1 :打开分数缩放
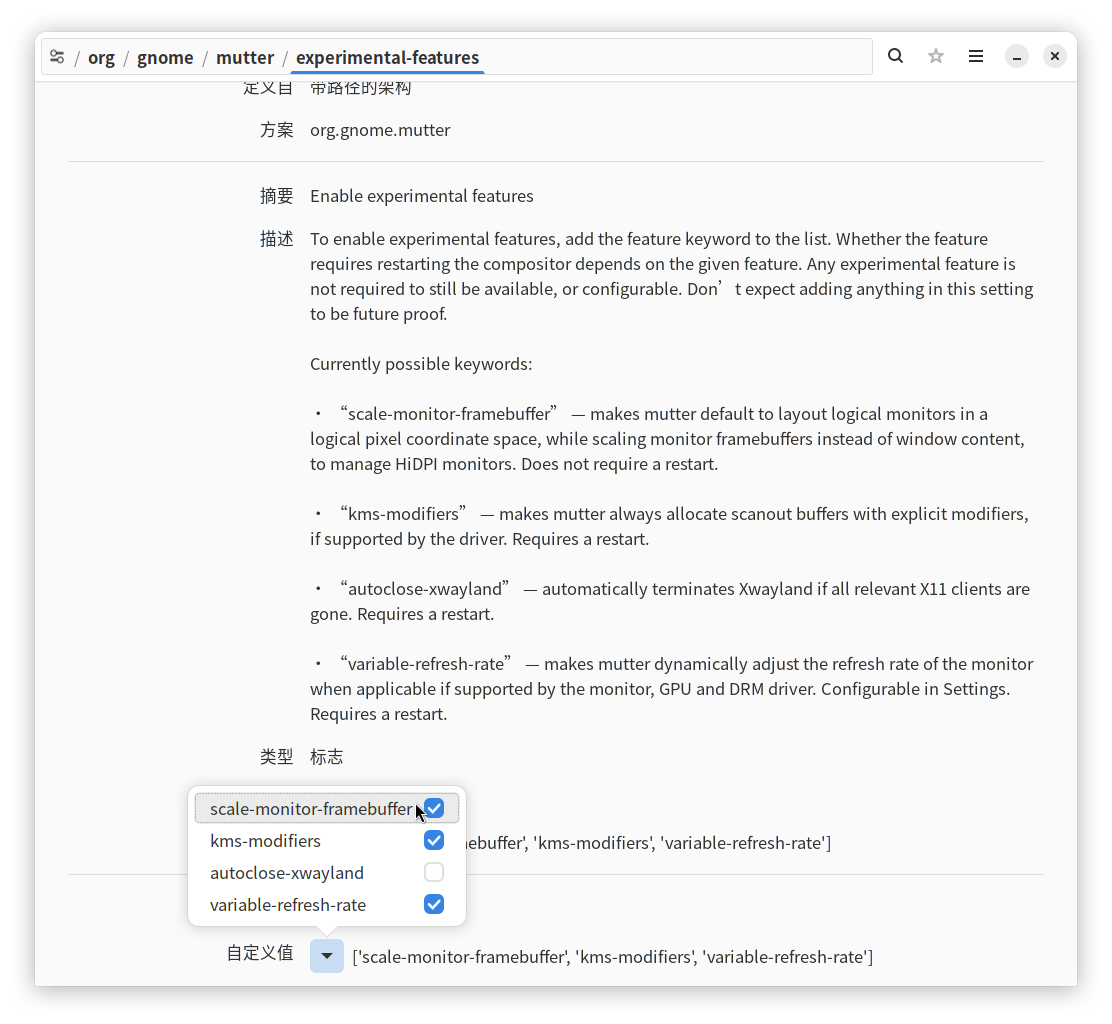
在软件APP搜索、安装并打开 Dconf Editor 这个软件

确保勾选上 scale-monitor-framebuffer 即可在设置APP的显示器设置里使用分数缩放了,其他的实验特性开关也值得你研究。
推荐设置2:为 Xorg 也配置下主GPU
教程:rpmfusion/Howto/Optimus#NVIDIA_PrimaryGPU_Support
感觉 Xwayland 会使用 Xorg 的配置文件才推荐的,实际上会不会我也不清楚。。。
